
Here is the tutorial for my Origami Market Bag in case you missed it the first time over on WhipUp.
I decided to whip up a simple tutorial for a handmade market bag called “The Origami Market Bag”. The name is taken from its unique folding technique. It makes up in a flash and is nice and roomy for all of your market treasure.
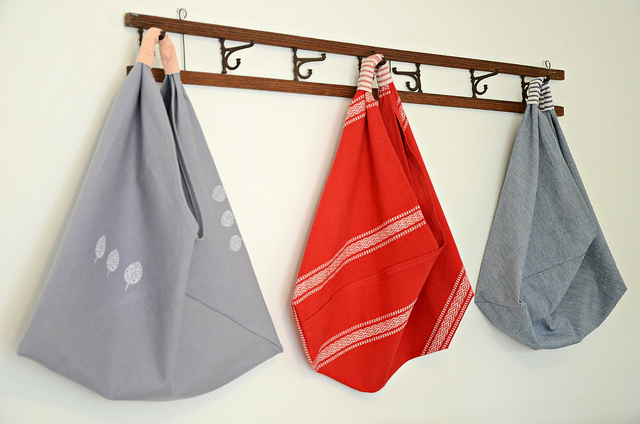
My version of this bag was originally based on a bag I received many, many years ago that was handmade by a family friend from the Philippines. That first bag was made from old cotton rice sacks (similar to vintage flour sacks) and the handles tied in a knot. Not long after receiving it, I made my own bag using a couple of bandannas sewn together. In the years since, I have seen many versions of this very simple bag. Many variations of it have shown up as craft trends come and go, then come around again. I have seen similar patterns in vintage craft books, Japanese craft pattern books and high end leather bags on the runway. I have even seen some in macramé! This is my updated version of that original bag that I received years ago.
My version of this bag was originally based on a bag I received many, many years ago that was handmade by a family friend from the Philippines. That first bag was made from old cotton rice sacks (similar to vintage flour sacks) and the handles tied in a knot. Not long after receiving it, I made my own bag using a couple of bandannas sewn together. In the years since, I have seen many versions of this very simple bag. Many variations of it have shown up as craft trends come and go, then come around again. I have seen similar patterns in vintage craft books, Japanese craft pattern books and high end leather bags on the runway. I have even seen some in macramé! This is my updated version of that original bag that I received years ago.
You will need fabric, thread, scissors and a sewing machine.
For the fabric, I suggest something a little heavier such as: canvas, linen, denim, or home décor type weight.
We start off with a piece of fabric whose length is 3 times the width. I found using a piece that is 17” X 51” (43cm X 130cm) makes a good size bag; you can play around with sizes if you like.
Once you have cut your piece of fabric to size, hem all of the raw edges.
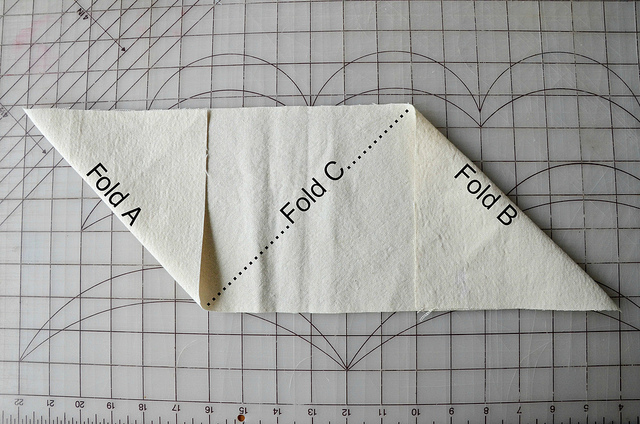
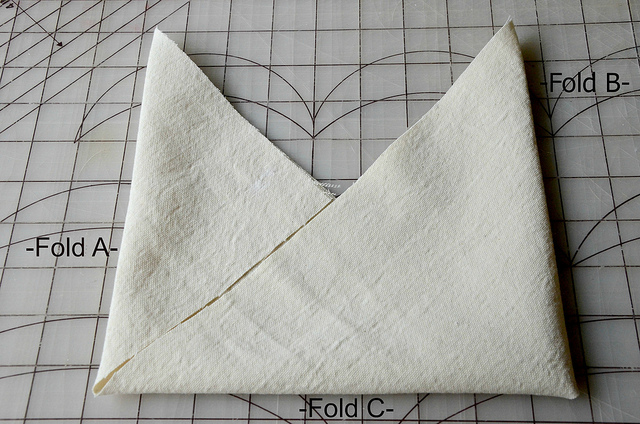
(In the following photos I’ve used a smaller piece of unfinished fabric just to show the folding technique)
Start by laying your fabric with your hems facing away from you and follow the folding technique as shown below.

Now pin and stitch as shown for both sides of the bag. I used about a 1cm seam allowance.
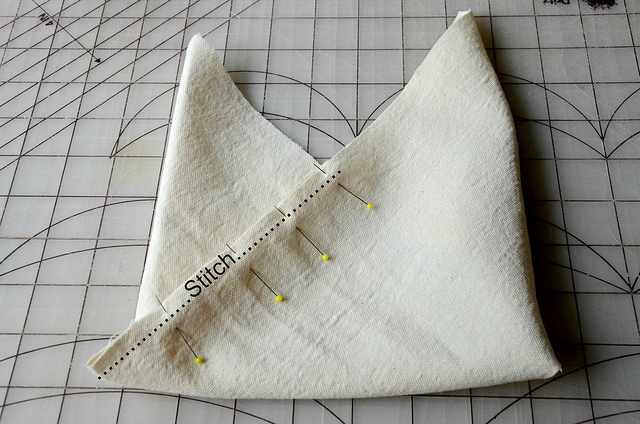
It is ok if your bag is a little off center, this may happen if your hems are not perfectly even to one another.
Now that you have sewn your 2 seams, you can leave the bag as is for a nice triangle shape, or you can create some shape by sewing boxed corners, or simple angled corners. Now turn your bag right side out and press if needed.


The next step is to create the handle for your bag. I used some coordinating fabric for a handle.
Cut a piece of fabric that is 3.5” X 6.5” (aprox. 9cm X 16.5cm) turn under and hem the 2 short sides of this piece. Fold the piece in half length-wise with right sides together and stitch raw edges with a ¼” (just under 1cm) seam allowance and turn right side out creating a tube.


Take one of the long top triangles of your bag and thread it through the tube of fabric as shown. Overlap the other top piece with the bit you have threaded through the tube and pin. Now stitch in place. Slide the tube over the stitched overlapped section and center it.


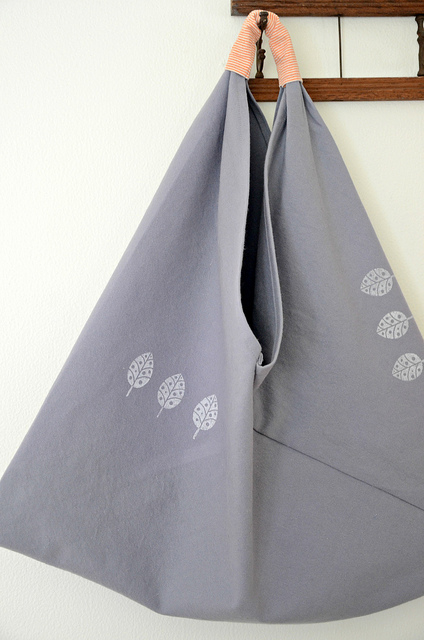
Ta Da! You now have your very own Origami Market Bag!

Go ahead and make a few more, you know you want to!

Please note, this tutorial is intended for personal use only. Therefore, do not reproduce, sell or commercialize in any form. Thanks for understanding!
27 comments:
Thank you for sharing! I'm keen to try this :)
I like it!
Greats from Germany
How nice!
How nice!
Oh this is so cute - and it doesn't look toooo difficult for a novice like me ... I love the contrasting handle, actually the whole thing is really clever!
Em x
So clever! I can't wait to make it!
Great!
wonderful!
if you like... this is my new market bag:
http://lyaundich.blogspot.de/2013/07/origami-market-bag.html
thanks:))
andrea
Thank you! This is a great tutorial!!!
These are so beautiful! They somehow manage to look effortless and deliberate at the same time. Also, I love origami and anything origami-inspired. It was a great idea to pick fabrics that were vaguely reminiscent of origami paper. I'd love to see these over at Kollabora, the online crafting community I'm part of—summer is a great time for tote inspiration.
Love it. Will be a perfect gift for my mum :) THANK YOU!
What a beautiful bag. Thank you for this Tutorial.
Greetings from Bavaria !
I made myself a bag like those ones thanks to your tutorial, there're really great !
Thank you.
This is a wonderfull tutorial, thanks
Ariane from Vienna
God! This is truly amazing. I loved the bag. I am amazed to see that I can also make it by y own. I have seen same handbag in Coach Clearance sale. I forgot the cost. But I liked this bag that time too. Thanks a lot for sharing your talent.
Dear Lola,
I recommended your great tutorial on my blog and added a photo from your post. Hope that's ok for you. If not, just write me a message.
Best wishes
Conny
hai ... I'm a bag lover, in my opinion your post is very inspiring, I learn a lot from your post . Keep posting travel bag karakter
no se ve como se dobla despued de doblar los dos laterales soy de mexico
Simple and great art this handbag is nice.
This might be the dumbest question you will get, but, well, here it goes. How do you do the finishing? I see the fabric has no finishing seams. How/when do you do the seams?
Thanks for this very helpful tutorial for this lovely bag. It looks great and it seems it's not too difficult to make. I want to try it.
Kind greetings from the EU.
Hello! Thanks for this tutorial. I have made these as holiday gifts several times with lots of compliments! Would it be ok to make a few for a holiday charity auction? Thank you.
I think i just found next years holiday gifts!! i will have all year to find just the right fabric for each person. LOVE that.. i bet i could make in a smaller size for the kids too. should be fun to try.
I just was wondering the same thing!! It looks like she added them in her finished product ones, so maybe just forgot to add that in.
Thank you Lola I hv made this bag
LOVE! I saw some crocheted versions and am so glad to find a cloth one!
Love the bag and the tutorial, I will try to make one, I'm not that great at sewing, so thank you for the easy to follow instructions.
Post a Comment